
Last modified on May 25, 2026 by Javier González
TOP SHOULDER EXERCISES TO BUILD STRENGTH WITH CALISTHENICS!
Today I’m going to show you some must-have shoulder exercises for your calisthenics routine. To train your shoulders effectively, you need to focus on all three heads: rear (posterior), front (anterior), and lateral (side).
In calisthenics, because of the nature of the most common exercises, we tend to overwork the front delts, train the rear delts a bit less, and unfortunately, the side delts often get left behind. But don’t worry—that ends today.
Start including these exercises regularly, and you’ll start developing well-rounded, muscular shoulders from every angle.
Most of these are compound movements, too, so you’ll also be working other key muscles like your chest, triceps, and traps, among others.
Calisthenics Shoulder Exercise #1: Decline Push-Ups


This push-up variation is performed with your feet elevated. By doing this, you introduce a slight vertical angle to the movement, which increases the load on your shoulders.
No need to overdo it—this is still a relatively simple exercise. Just placing your feet on a step or any object about 6 to 8 inches high is more than enough.
Place your hands at shoulder width, and keep your core and glutes tight, just like in a standard push-up.
If it feels too easy, you can add weight (a backpack works great) or raise your feet higher to increase the challenge.


Calisthenics Shoulder Exercise #2: Pike Push-Ups
This is a slightly more advanced variation than the decline push-up, and it’s one of the best shoulder exercises you can do in calisthenics.
In this case, you don’t need to elevate your feet. What you’re aiming for is a “V” or inverted triangle shape, by bringing your feet as close to your hands as your flexibility allows. As you lower yourself, try to bring your head down between your arms.
It might be challenging at first—either due to a lack of strength or limited flexibility—but it’s absolutely worth the effort. If mobility is an issue, I recommend doing a few stretches beforehand to loosen up before attempting this movement.
If pike push-ups start to feel too easy, try elevating your feet, just like you did with decline push-ups. You should aim to master the advanced pike push-up position (as shown in the image on the left) before moving on to the next exercise, which is the handstand push-up.
I want to really emphasize this point because the jump from one to the other is huge, and as far as I know, there’s no widely used or practical progression that serves as a true middle step between them.
So don’t get discouraged if handstand push-ups feel impossible at first—it just means you need more time building strength through the different pike push-up variations.
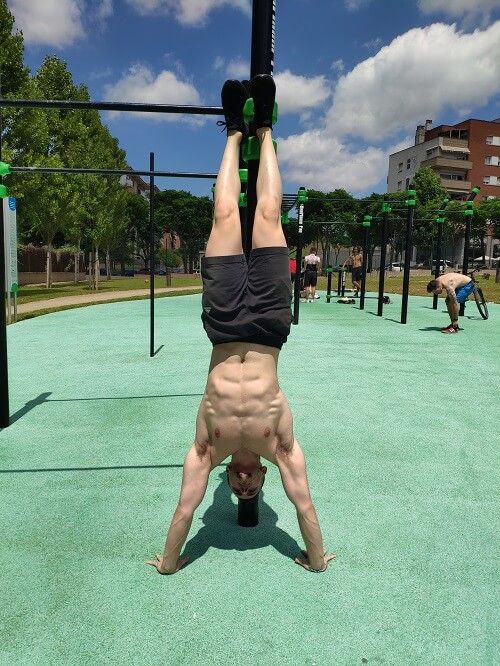
Calisthenics Shoulder Exercise #3: Handstand Push-Ups
Handstand push-ups are the ultimate shoulder exercise in calisthenics—at least when it comes to foundational movements. Even though they’re listed under shoulder training, they also work several other muscles like the chest, triceps, and traps. This is a very advanced exercise that requires not only strength but also balance and proprioception, which adds a whole new level of complexity.

Before you even attempt this movement, I strongly recommend checking out my handstand guide, where I break down the technique and share drills to help you hold the position properly.
Since I already cover that in detail in the other post, I’ll skip straight to the steps you should follow to start working toward full handstand push-up reps:
1. Wall-Assisted HSPUs (facing out)
These are handstand push-up reps performed with your back to the wall. They’re great for building strength and represent a big jump from the pike push-ups mentioned earlier.
Focus on keeping clean form at all times: find a comfortable position that allows you to lower down with your elbows tucked and without any awkward movement.
A common mistake when doing these against the wall is forgetting to engage your core and glutes, which can cause your lower body to sag. Make sure you stay tight so the right muscles are doing the work.
2. Wall-Assisted HSPUs (facing in)
This time, your chest faces the wall. These are more difficult because they better mimic the freestanding handstand position and allow for a greater range of motion.
You should definitely work on these if your goal is to transition smoothly into freestanding reps.
3. Freestanding Isometric HSPUs / HSPU Negatives
At some point, you’ll feel confident with the assisted versions but find that freestanding reps are still a struggle.
That’s the perfect moment to start training isometric holds: kick up into a handstand, lower just a bit, and hold the position as long as you can. You can also do this version assisted against a wall.
Negatives are also key for building strength in this movement. Make space for them in your sessions—you’ll definitely feel the difference. And yes, these can be done assisted as well.
4. Freestanding Handstand Push-Ups
If you’ve made it this far, you’re a beast—so I won’t say much more. Keep enjoying the movement and try out more advanced variations like deficit HSPUs or 90-degree push-ups.
And if you really want to level up, try adding weight.


Calisthenics Shoulder Exercise #4: Resistance Band Training
As I mentioned at the beginning of this post, some parts of the shoulder tend to get neglected—specifically the lateral and rear delts.
To fix that, I’ve got three targeted exercises to help you strengthen those areas.
Your job is to choose the right type of resistance band for your level. I personally use a band that offers around 15 kg (about 33 lbs) of resistance, which you can find at most sports stores or online.
Of course, if you have dumbbells at home, you can also train your shoulders with those. That opens up a whole new range of possibilities. Still, many of those exercises can be effectively replicated using resistance bands and other simple accessories.

Upright Row with Resistance Band (Lateral delts)

T Rows with Resistance Band (Rear delts)

W Rows with Resistance Band (Rear delts)
Stop Guessing. Start Growing.
Get a professional roadmap built specifically for your current level and goals.
Get My Personalized PlanNow you’ve got plenty of shoulder exercises to build your own routine. You can also try combining them—for example, pairing shoulders and chest for a solid push-day workout. Another great option is to train shoulders with back, like I do, mixing in pulling exercises for a more balanced session.
At the end of the day, the possibilities are endless—just choose the approach that fits you best. Feel free to drop any questions in the comments below.
See you around!
Leave A Comment