HOW TO DO BACK LEVER | CALISTHENICS WORKOUT
Welcome to a new exercise guide! This time, you’re about to dive deep into the famous back lever. I’ll give you a detailed breakdown of the move, covering the proper technique, the muscles involved, and some extra tips. If you’re already familiar with the movement, you might want to skip ahead to this other article where I explain the progressions you need to master the back lever.
BACK LEVER INTRODUCTION
The back lever is a pulling move that’s relatively easy to learn. It won’t take you long as long as you have a solid foundation in the basics. You could say that how impressive it looks doesn’t quite match how hard it actually is to do. I’ve even heard some say it’s trickier than the front lever, despite appearances. Still, no static hold should be taken lightly, since the positions involved are challenging and need to be trained properly.
PRINCIPALES: Deltoides (posterior y anterior) – Pectoral
SECUNDARIOS: Bíceps – Tríceps – Trapecios – Flexores de muñeca
DE SOPORTE: Core – Glúteos – Cuádriceps – Bíceps femoral.
MÚSCULOS IMPLICADOS
Lo que hace relativamente sencillo este ejercicio es el hecho de que involucra una gran cantidad de músculos, muy potentes y además la tensión se reparte bastante bien entre ellos y lo hace más soportable. El mayo peso se lo llevan el deltoides y el pectoral, aunque el bíceps se ve forzado por la posición de los brazos. A nivel postural, el core y los glúteos son fundamentales para conseguir estira y aguantar el cuerpo.
BACK LEVER TECHNIQUE
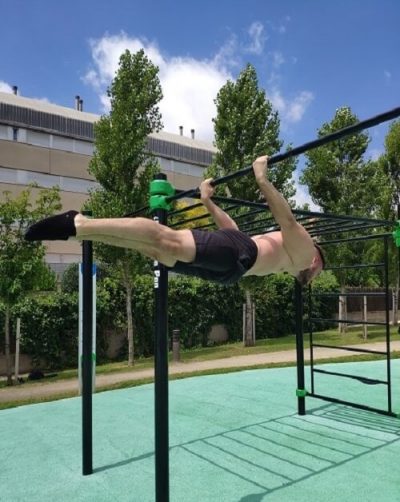
- Scapular Protraction: Unlike the front lever, in this move you want to aim for a protracted scapula position—basically, spreading your shoulder blades as far apart as possible. If done right, you’ll get that classic “shell” shape (that’s how I like to call it, not very technical), with your shoulders closer together than usual, your chest slightly contracted, and your shoulder blades spread wide.
- Pelvic Retroversion: This happens when you squeeze your glutes to correct your pelvis posture, which in turn aligns your spine. The main goal here is to keep the back lever from looking saggy, which is no small feat.
- Plantar Flexion: This is the movement of pointing your toes, flexing your ankles toward your toes.
- Neutral Neck: Your neck should be aligned with the rest of your body, without forcing it in any direction.
- Hands Shoulder-Width Apart: At first, this is the recommended grip width, though you can play around with it later on.
- No False Grip: Use a regular grip to avoid complications—keep your thumb under the bar and hold firm.
- Aim for Horizontal: From your head to your toes, you should be able to draw a straight line. If not, check your form.
TIPS TO NAIL THE BACK LEVER FASTER
As always, here are some tips from my own experience and mistakes to help you learn the back lever quicker. There’s not much mystery to this move, so here are the few pointers I have for you:
-
Shoulder Mobility: Super important if you want to learn this move faster and make it look smooth. Poor shoulder flexibility will make the position uncomfortable, give you a hunched look, and increase injury risk.
-
Don’t Obsess Over Progressions: Some folks might disagree with me here, but hear me out. While progressing step-by-step to the full back lever is safest, it’s not always the most practical. In my opinion, the back lever is doable enough to start from a more advanced progression, as long as your muscles are well-prepped with basic moves (push-ups, dips, handstand push-ups, planks, etc.). So focus on getting strong first and then give it a try—starting too early might slow you down or cause a stall.
-
Get Your Form Corrected: Without experience, it’s tough to know if you’re at the right angle. It’s easy to settle for halfway (not hitting the full 180°) and feel like a superhero. That’s why having someone guide you or recording yourself is crucial. If you nail it on your first try, awesome—but you won’t know until you check.
-
Keep Your Arms Close: When starting out, work with a slightly narrower grip, keeping your arms as close to your body as possible. Don’t go too extreme or it’ll get uncomfortable. This will make the move easier, and you can widen your grip once you’re more experienced.
That’s it for this first part of the back lever guide! Hope it wasn’t too heavy, and remember you’ve still got other articles to go through. Don’t worry, the next ones are more hands-on. You can find links at the start of this article or below—lots of ways to get to them! If you have any questions, don’t hesitate to drop them in the comments—I’ll get back to you ASAP. See you next time!


Leave A Comment